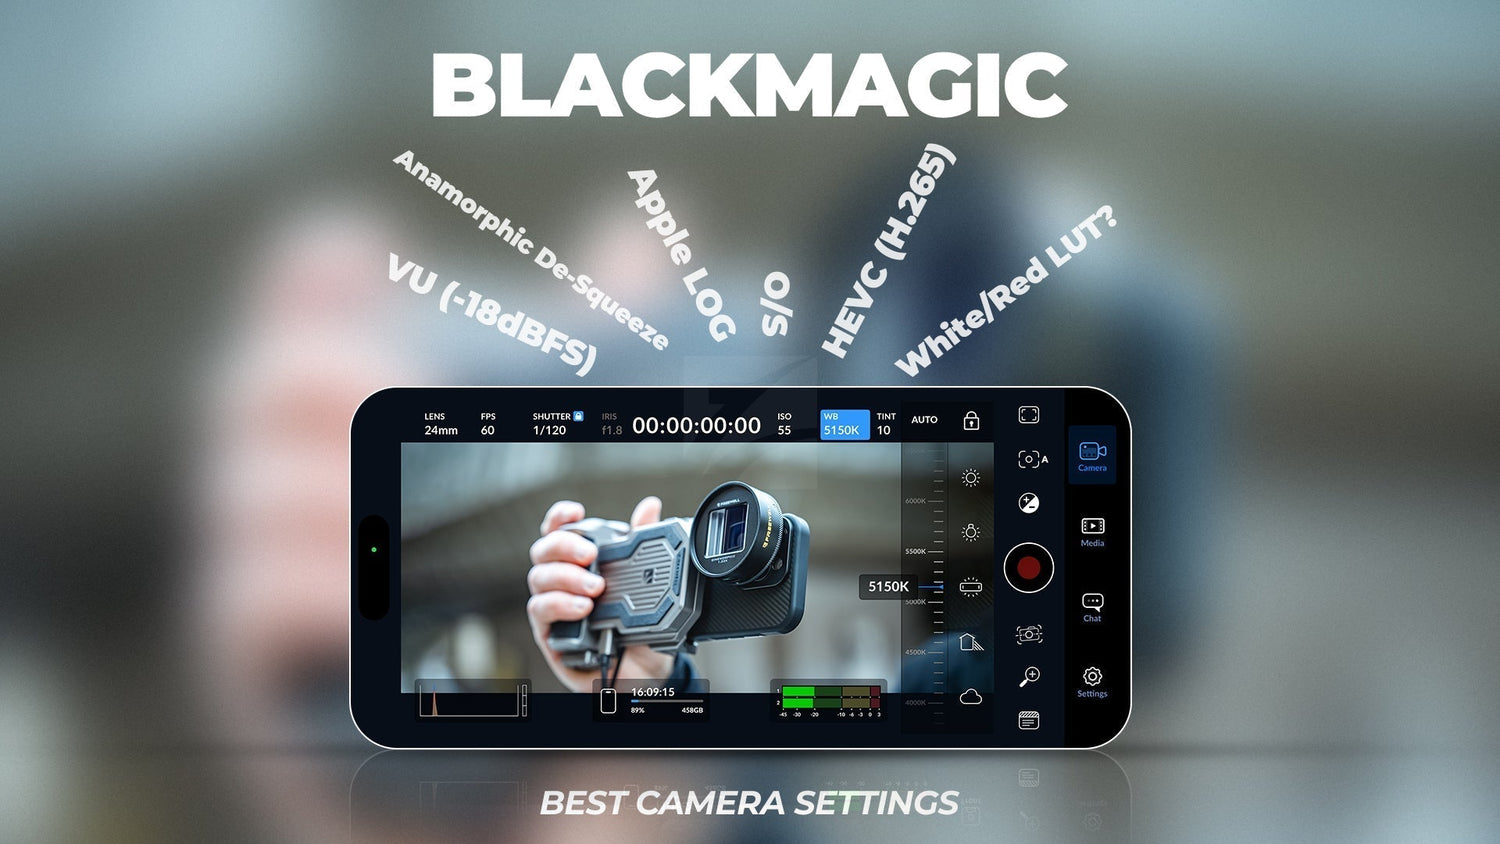
Blackmagic Camera App: Best Settings to Shoot Cinematic Films with Your iPhone
Freewell Care
In today’s world of mobile filmmaking, smartphones are no longer just communication tools. With apps like the Blackmagic Camera app, your iPhone transforms into a powerful cinematic tool capable of producing high-quality footage. Whether you're creating short films, vlogs, or social media content, this app provides professional-level features to take your filmmaking to the next level.
In this guide, we’ll explore the core features, advanced settings, and pro tips of the Blackmagic Camera app, so you can start creating cinematic films directly from your phone.
Blackmagic Camera App - Getting Started
Before diving into advanced settings, let’s set up the basics to ensure your Blackmagic Camera app is ready to go.

Step 1: Turn Off Orientation Lock
To ensure you get the best cinematic results, disable your phone’s orientation lock so you can film in landscape mode. This is the aspect ratio typically used in professional filmmaking.
Step 2: Launch the App and Get Ready to Film
Open the Blackmagic Camera app and hold your phone horizontally for landscape mode. The app interface is simple, consisting of four main tabs:
-
Camera: The shooting interface where you capture footage.
-
Media: To review your recordings.
-
Chat: For collaboration and communication.
-
Settings: To fine-tune preferences.
Blackmagic Camera Features
The Blackmagic Camera app offers powerful tools to help you control every aspect of your shot. Let’s walk through the essential features:

1. Lens Selection: Choose the Right Lens for Your Scene
The Lens Selection feature allows you to choose the best lens (wide, ultra-wide, or telephoto) for your scene requirements.
-
Wide Lens: Great for landscapes or shots requiring a larger field of view.
-
Ultra-Wide Lens: Perfect for capturing expansive scenes, such as large groups or dramatic vistas.
-
Telephoto Lens: Ideal for getting close-ups of distant subjects without physically moving the camera.
Selecting the appropriate lens can drastically change the perspective and feel of your shot, giving you more control over how the audience experiences your scene.
2. Frame Rate: Achieve Smooth Playback and Streaming
The Frame Rate setting is crucial for achieving smooth video playback. The recommended 60fps (frames per second) is ideal for internet streaming and video playback, providing a fluid and professional look.
-
60fps ensures that your footage plays smoothly on most platforms, delivering high-quality visuals whether you’re streaming online or creating cinematic content.
If you're looking to create slow-motion footage, you can lower the frame rate to capture more frames per second and play them back slower for dramatic effects.
3. Shutter Speed: Maintain Natural Motion Blur
Your Shutter Speed controls how motion is captured in your video. To get the most natural motion blur, set your shutter speed to 2x the frame rate (e.g., 1/120 for 60fps).
-
This setting helps create more fluid and organic motion, mimicking what our eyes see in real life.
-
ND filters (Neutral Density filters) can help you manage exposure in bright conditions without affecting shutter speed.
If you don't have an ND filter, the app's Auto Exposure Lock feature can help maintain proper exposure levels in dynamic environments.
4. Fixed Aperture: No Need to Adjust
The Fixed Aperture on iPhones means that the aperture remains locked and can’t be manually adjusted, unlike traditional cameras. This simplifies your shooting process since you don’t need to worry about adjusting aperture values during filming.
-
The app automatically adjusts exposure based on available light, so you can focus on other settings like shutter speed and ISO for better control over your shots.
5. Timecode: Sync Footage Across Multiple Cameras
Timecode is essential when working with multiple cameras in a larger production. It allows you to sync footage from different cameras accurately in post-production.
-
This is especially useful when you’re shooting a scene from multiple angles or need to match up footage from various takes or locations.
-
It ensures a seamless editing experience, saving time during the editing process.
6. ISO (Sensitivity): Keep Image Quality at Its Best
ISO determines your camera’s sensitivity to light, impacting the exposure and noise in your footage. For the cleanest image, it’s recommended to keep ISO below 1600.
-
Higher ISO values may introduce noise or grain, especially in low-light conditions.
-
Lower ISO values give you the best image quality, so adjusting it in bright environments ensures you capture clean and professional footage without compromising image quality.
7. White Balance: Maintain Accurate Colors
White Balance controls the warmth or coolness of your image by adjusting the color temperature.
-
Manually setting White Balance ensures that colors look true to life and prevents unnatural color shifts in your footage.
-
Use this feature to correct lighting conditions, whether you're shooting in artificial light, daylight, or mixed lighting environments.
By setting the proper white balance, you ensure your skin tones and overall scene colors are accurately represented.
8. Tint (Color Tone): Achieve Smooth Playback and Streaming
Adjust the Tint (Color Tone) to manage the warmth or coolness of your image. Setting this correctly is important for achieving the right mood in your video.
-
Recommended 60fps is ideal for smooth playback on streaming platforms and video websites. Proper tint control ensures that the colors in your footage are balanced, and the video looks professional for online audiences.
9. Resolution Indicator: Track Your Video Quality
The Resolution Indicator shows the current recording resolution, such as 4K, so you always know the quality of the footage you're capturing.
-
Recording in 4K ensures you have the highest resolution possible for your project, giving you flexibility in post-production, whether you're cropping or zooming in on your footage.
-
If you need smaller file sizes or want to save storage space, you can opt for lower resolution settings.
Blackmagic Camera app's additional Key Features
The Blackmagic Camera app has several additional advanced features that further enhance your shooting experience.

10. Assistive Guides
Assistive guides enhance shot composition, but what’s new is the ability to customize their opacity and color. Adjusting these allows you to match your visual preferences or adapt to different lighting conditions during filming.
11. Focus Mode
When switching to Manual Focus, the AB points function allows for smooth focus pulls, giving you more control over focus transitions, making it easier to create cinematic depth in your shots.
12. Exposure Compensation
Beyond adjusting exposure via ISO, this feature also allows you to manage exposure in real-time by fine-tuning ISO settings directly from the interface, ensuring better control for lighting changes mid-shot.
13. Record Button Modes
New to the app is the ability to quickly toggle between different modes for specific needs like Timelapse or Variable Frame Rate recording, giving you more flexibility on the fly.
14. Stabilization Mode
The Stabilization Mode adds digital stabilization to reduce camera shake, particularly helpful for handheld shooting without additional gear like gimbals or tripods, making it easier to achieve smooth footage.
15. Digital Zoom
While digital zoom crops into the image, it’s particularly useful for tight framing when you cannot physically move the camera closer to your subject, allowing for a more flexible shooting experience in confined spaces.
16. Slate / Clapperboard
The Slate/Clapperboard feature now also allows you to add custom scene metadata, which streamlines the post-production process by providing organized, searchable information.
17. Audio Meter: Live Audio Monitoring
The Audio Meter also includes real-time level monitoring during recording, giving you immediate feedback on audio quality. Adjustments can be made on the spot to prevent audio distortion.
18. Storage Indicator: Track Available Recording Time
The Storage Indicator now includes real-time space updates while recording, making it easier to manage storage and avoid running out of memory during lengthy filming sessions.
19. Histogram: Visualize Exposure Distribution
The Histogram isn’t just for exposure; it also shows you the dynamic range of your image, helping to visualize where your shadows and highlights fall, guiding your adjustments for perfect lighting.
20. LUT Mode: Apply Look-Up Tables to Your Footage
You can now preview LUT effects in real-time, which helps you decide on the final look during filming and experiment with different color grades without having to apply them in post-production.
Blackmagic Camera's Advanced Features for Cinematic Control
Now that you’re comfortable with the basics, let’s explore the advanced features that will help you create stunning, cinematic footage.
Blackmagic Camera App - Anamorphic Lens De-Squeeze

For cinematic wide-screen shots, the Anamorphic Lens De-Squeeze feature allows you to choose between 1.33x or 1.55x de-squeeze ratios. This will provide the signature letterbox look of anamorphic lenses.
Freewell Anamorphic Lenses
Take your videos to the next level with Freewell Anamorphic Lenses. These lenses offer a stunning widescreen cinematic look with beautiful lens flares. Choose from:
1.33x Anamorphic & 1.55x Anamorphic Lenses
-
Blue Streak: Ideal for sci-fi and cool tech scenes.
-
Gold Streak: Perfect for sunset or golden hour shots.
-
Neutral Streak: A classic look with natural flares.
Variable Frame Rate

Create beautiful slow-motion or fast-motion shots using Variable Frame Rate (VFR):
-
Slow Motion: Set O = 2 × S for slow-motion (footage will play at half speed).
-
Fast Motion: Set O = 0.5 × S for fast motion (footage will play at double speed).
The record button will change shape when VFR is active.
Blackmagic Camera app audio settings for professional sound
Good audio is just as important as good visuals. The Blackmagic Camera app includes a variety of audio controls to ensure high-quality sound:

-
Audio Source: Choose between the iPhone microphone or an external mic for improved sound quality.
-
Audio Formats: Use AAC for standard audio or Linear PCM IEEE Float for lossless quality and flexibility during post-production.
-
Record Audio: Supports stereo recording when using external microphones.
-
Sample Rate: Set to Auto for optimized audio capture without manual adjustments.
-
Audio Meter: Displays the VU meter calibrated at -18 dBFS for precise audio monitoring.
-
Audio Monitoring: Use headphones for live audio monitoring during recording, ensuring no issues during your shoot.
-
Audio Output: Choose between headphones or iPhone speaker for playback during or after recording.
Blackmagic Recording Settings: Dial in the Technical Backbone of Your Footage
The Recording Settings section is where cinematic control begins.

- Using HEVC (H.265) is ideal for solo creators or mobile editors working with limited storage, but if you're editing on desktop with Pro workflows, ProRes will pay off in post.
- The Apple Log - HDR color space, while requiring post-color work, gives significantly more room for grading—ideal if you're shooting in varied lighting or want a filmic look.
- The Timecode Display helps sync multi-cam shoots or audio recorded separately. Pair this with Frame Drop Alerts and you're equipped to shoot long takes without surprises.
Bonus tip: even if you're not using Timelapse, the “Capture 1 Frame Every” setting is a creative goldmine for motion design or stylized B-roll.
Blackmagic Camera Monitoring Settings: Real-Time Control Over Your Footage
The Monitoring Settings in the Blackmagic Camera app allow you to fine-tune your shooting experience, ensuring perfect framing, focus, exposure, and more. Here are the essential settings to adjust while filming:


-
Focus Assist Color: Choose red for high contrast focus assistance, helping you quickly identify focused areas.
-
Guides Opacity: Set to 25% for a subtle guide that aids in shot composition without overwhelming the scene.
-
Grids Opacity & Color: Adjust grid opacity to 25% and color to white for better framing and alignment of your shots.
-
Display Audio Meters: Turn this on to monitor your audio levels in real-time, ensuring your sound is captured correctly.
-
Display Histogram: This tool helps you visualize exposure distribution, ensuring perfect lighting balance.
-
Display Storage Status: Keep track of your remaining recording time, especially for longer shoots or high-resolution footage.
-
Display Battery Indicator: Off or on, depending on your preference, to monitor battery life during shoots.
These settings offer full customization of how you view your footage during shooting, giving you real-time feedback on key aspects like focus, audio, exposure, and more.
Blackmagic camera app's Codec: Balance Quality and Workflow
Choosing the right codec is about more than quality—it's about your editing and storage workflow.

-
Apple ProRes 422 HQ is overkill for most casual use but shines in green screen work or heavy color grading.
-
Apple ProRes Proxy is fantastic when you plan to edit on a laptop and later relink to high-quality files.
-
HEVC (H.265) is your go-to for mobile-first projects, YouTube, or social content—it saves space and still delivers.
-
Bit Rate matters too: unlocking the full 81 Mbps bit rate maximizes the performance of HEVC but be sure your storage can keep up.
Pro Tip: On iPhone 15 Pro and newer, offloading footage directly to external storage using Freewell's Pro SSD Hub lets you shoot longer without managing space mid-session.
Blackmagic Color Space: Control Your Footage’s Visual Depth
In the Blackmagic Camera app, the Color Space setting allows you to choose the ideal color profile based on your project and post-production needs:

-
Rec.709: The standard SDR color space, best suited for normal video shooting. It covers approximately 50% of the color gamut, making it the go-to for most traditional videos.
-
Rec.2020 - HDR: This wide color gamut is designed for HDR video and Dolby Vision, delivering a higher dynamic range and vibrant colors. Use this setting if you're working with HDR content or need it for professional HDR workflows.
-
P3 D65: A cinema-standard color space that’s often used for cinematic projects and Apple devices. It offers a wider color range and is ideal for high-quality film projects, though it’s less common in everyday use.
-
Apple Log - HDR: Exclusive to the iPhone 15 Pro and newer, this logarithmic HDR color space allows you to capture footage with extended dynamic range, perfect for color grading in post-production. Ideal when paired with LUTs for flexibility and professional results.
Each color space has its use cases, from standard SDR work to HDR and cinematic productions, providing the flexibility to adapt to different platforms and grading needs.
Blackmagic Camera App 3.0 Update: New Features for Mobile Filmmaking
You loved our in-depth guide to the Blackmagic Camera app, and for good reason. It transformed our iPhones into professional-grade filmmaking tools, and the best part? It was completely free. Well, grab your phone because it just got even better.
Blackmagic Design has dropped the monumental Version 3.0 update, and it’s packed with features that further blur the line between mobile and professional cinema cameras. Consider this the essential follow-up to our original guide, where we’ll walk you through all the exciting new tools now at your fingertips.
New Blackmagic Camera App Interface and Customization
The app interface has received a thoughtful redesign to speed up your shooting process, building upon the foundational controls we already covered.
 Left-Side Quick Menu
Tapping on the left side of the screen now brings up a quick-access menu for Presets, Slate, and Remote Control. This is a game-changer for studio work, allowing you to instantly switch between pre-configured settings for different lighting setups, making the Presets feature more accessible than ever.
 Customizable Quick Buttons F1, F2, F3 on the Right
On the right, a new triple-dot icon reveals three fully customizable function buttons. You can assign dozens of different functions to these, using them as toggles or for preset modes. For example, we’ve set ours up for one-tap toggles for Auto-Exposure, Zebra, and False Color, putting these critical monitoring tools right where we need them.
Blackmagic Camera Monitoring Features: Full-Screen and Exposure Tools
Monitoring your image accurately is crucial, and version 3.0 adds some powerful, albeit nuanced, tools to the Monitoring Settings we previously detailed.
Full-Screen Mode: Tap the Histogram icon to enter a clean, full-screen view, perfect for judging composition and exposure without any UI distractions.
 It’s important to note that an issue from previous versions persists: Zebra and False Color can act unpredictably at lower ISO values (below the iPhone's native 1600 ISO). Furthermore, in this new full-screen mode, the histogram's overexposure "traffic light" will not warn you of clipping if you're using a non-native ISO. Always keep an eye on the peak values on the right side of the histogram, if they're hitting the top, you're overexposing.
Advanced Cinematic Features
This update isn’t just about workflow; it’s about unlocking new creative possibilities right in the camera.
Using Built-in LUTs in Blackmagic Camera
One of the coolest additions is the inclusion of built-in LUTs (Look-Up Tables). You can now bake a specific look directly into your footage, expanding on the preview capabilities of the LUT Mode we already discussed.

After testing them all, we found the Vivid LUT to be the standout, delivering natural colors that aren't overly saturated or exposed, giving you a fantastic starting point right out of the camera.

Anamorphic Lens Support in Blackmagic Camera
For all the anamorphic lovers out there, Blackmagic Camera now officially supports a 2x Desqueeze ratio, adding to the existing 1.33x and 1.55x options and making it easier than ever to get that classic cinematic widescreen looks with compatible lenses.

How to Create a Dolly Zoom Effect
That iconic "Vertigo effect" is now in your pocket. You can set the duration and amount of the zoom to create perfectly slow, creeping dolly zoom shots.
 Dolly Zoom
Time lapse & Lens Selection
Furthermore, the FPS tab now includes dedicated time-lapse capabilities and offset FPS settings, making it much easier to access these features.
 Time Lapse option
They've also moved the lens selection menu to the bottom of the screen, making it much easier to switch with your thumb when shooting vertically.
 Lens Selection
Open Gate Recording on iPhone 17 Pro
For users with the latest iPhone 17 Pro, you now have access to Open Gate recording, utilizing the full sensor for maximum flexibility in post-production.
 Choosing Open Gate
Now you can record Open Gate with H.265 Codec which saves an enormous amount of file size. Stick with Apple Log for Post Correction Fexibility. A crucial note: Open Gate recording disables all stabilization, so a tripod or gimbal is a must.
How to Live Stream with Blackmagic Camera
You can now go live directly from the app. On Android, you can stream straight to platforms like YouTube and Twitch. iPhone users currently need to route the stream through the Blackmagic Cloud app, but we're hoping for more direct integration in the future.

Final Thoughts: Take Your Filmmaking to New Heights
The Blackmagic Camera app is a powerhouse for mobile filmmakers, offering professional-level features in the palm of your hand. With the latest 3.0 update, features like built-in LUTs, a redesigned interface with customizable buttons, dolly zoom, and live streaming make this free app more powerful than ever.
By mastering features like lens control, anamorphic de-squeeze, VFR, and focus assist, you can capture breathtaking shots that look like they came from a high-end film production.
Blackmagic Camera App is available on App Store